
Are you looking for a dessert that’s delicious, healthy for you and the environment? Are you hosting a dinner party or holiday gathering and need a vegan dessert that everyone will love?
Look no further! Whether you’re in the mood for a classic apple pie or something more original, there’s a vegan pie recipe out there for you. In this blog post, I’ll share some delicious and healthy vegan pie recipes.
These plant-based pie recipes are not only healthy, but they’re also a great way to show you and your friends and family that vegan food can be just as tasty and satisfying as traditional dishes.
So, here are 4 healthy vegan pie recipes (+1 bonus recipe):
- Vegan peanut butter pie
- No-bake vegan apple pie
- Vegan strawberry pie
- No bake vegan pumpkin pie
- Vegan Banana Cake
1. Vegan Peanut Butter Pie
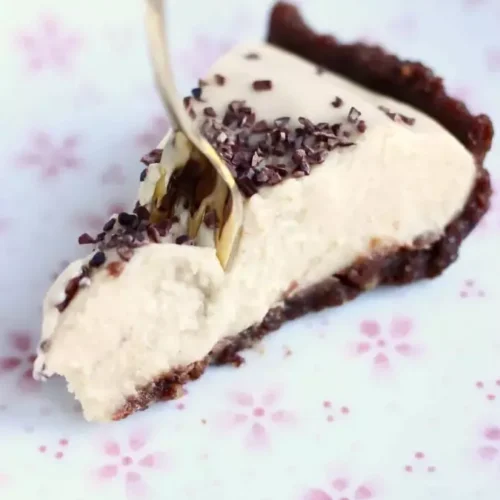
Vegan peanut butter pie
Ingredients
For the crust:
- 65 g (1/2 cup) walnuts (or sub pecan nuts or brazil nuts)
- 90 g (1/2 cup) pitted dates
- pinch salt
- 1 tbsp cocoa powder
For the filling:
- 200 g (7 oz) sweet potato (roughly one medium-sized sweet potato)
- 150g g (3/4 cup) coconut yogurt (or sub any other plant-based yogurt)
- 65 g (1/4 cup) peanut butter (or sub almond butter)
- 2 tbsp maple syrup to taste (or sub any other sweetener)
To decorate (optional):
- Cacao nibs
Instructions
For the crust:
- Add all the ingredients for the crust to a food processor and blitz until you get a crust that easily sticks together but that still has some texture.
- Use your fingers to carefully press the mixture across the bottom and up the sides of a pie dish (I used a 22.5 cm/9 inch pie dish) – press down with your fingers, the back of a spoon or the bottom of a small cup or glass to make it as compact as possible.
- Place in the fridge while you make the rest
For the filling:
- Cook the sweet potato by boiling, steaming or roasting.
- Discard any skins and add to the same food processor (no need to wash it) and whizz until completely smooth.
- Add the peanut butter, coconut yogurt and maple syrup and blend again until smooth.
- Taste and adjust amount of maple syrup if necessary.
- Place the filling in the crust and sprinkle over cacao nibs to decorate, if desired.
- Can be eaten immediately, but leaving it in the fridge for a few hours to firm up before cutting is advisable.
- Keeps well covered in the fridge for up to a few days.
Notes
2. No-bake Vegan Apple pie
No-bake vegan apple pie
Ingredients
- 1 1/2 cups raw sunflower seeds
- 1 cups raisins, divided
- 4 medium apples, peeled, cored and thinly sliced
- 1 tbsp cinnamon
- 1 tbsp apple cider vinegar
- 1-2 tsp agave nectar (optional)
Instructions
- In a food processor, pulse the sunflower seeds and 1/2 cup of the raisins until finely ground. Optionally, add 1 to 2 teaspoons of raw agave nectar to help the mixture stick together a bit more, and pulse a few more times.
- Press two-thirds of the dough into the bottom of a pie pan, reserving the last third for the topping. Place the pan in the freezer to firm up.
- Meanwhile, place the apple slices in a large bowl and set aside.Using a food processor, blend the remaining half cup of raisins, cinnamon, apple cider vinegar, and 3 tablespoons of water until smooth. My mixture never really got smooth – it was still kind of lumpy, but I probably didn’t blend it long enough. Didn’t seem to matter, though.
- Pour the raisin mixture over the apple slices, gently stirring until well coated.
- Remove the pie crust from the freezer and, working in circles from the outside in, layer the coated apple slices over the crust.
- Sprinkle some of the remaining crust mixture over the apple slices. It can be helpful to let the pie firm up in the freezer a bit before attempting to slice, as it can get a little messy.
Notes
3. Vegan Strawberry Pie (Gluten-free)
Vegan Strawberry Pie
Ingredients
For the pastry:
For the strawberry jelly:
- 200 g (7 oz) fresh strawberries, hulled and roughly chopped
- 2 tbsp lemon juice
- 8 tbsp maple syrup (or sub any other sweetener)
- 1 tsp agar (check instructions on packet as quantities needed can vary between brands)
To assemble:
- 255 g (9 oz) fresh strawberries, hulled and finely sliced
For the coconut whipped cream (optional):
- 400 g (14 oz) tin of full-fat coconut milk
- 1/2 tsp vanilla extract
- 2 tbsp maple syrup (or sub any other sweetener)
Instructions
For the pastry:
- Preheat the oven to 180 degrees Celsius (350 degrees Fahrenheit)
- Combine all ingredients in a large bowl until it forms a firm dough – add the water a few tablespoons at a time so that you don’t add too much!
- You can keep this pastry dough in the fridge for up to a day if you like, but there is no need to chill it before using
- Place the pastry dough into a greased pie dish and use your fingers to carefully press it across the bottom and up the sides of the dish – I used a 20.5 cm/8 inch pie dish
- Use a fork to pierce the surface (remember the sides too!) of the pastry, so that it doesn’t puff up in the oven. Alternatively, you can use baking beans
- Bake in the oven for around 30 minutes, until the pastry crust is firm to the touch and golden brown
- Leave to cool slightly before pouring in the strawberry jelly
For the strawberry jelly:
- Place the strawberries, lemon juice and maple syrup in a food processor or blender (or use a hand-held stick blender) and whizz until completely smooth
- Transfer the mixture into a measuring jug and top up with water until the mixture reaches the 300ml (1 ¼ cup) mark
- Transfer the mixture into a pan and bring to the boil
- Turn down the heat, add the agar, mix well and simmer for a few minutes before turning off the heat
- The strawberry jelly needs to be poured into the pastry crust immediately otherwise it might set in the pan!
To assemble
- Place the sliced strawberries into the pastry crust
- Pour over the jelly mixture
- Leave to cool and place in the fridge for at least a few hours until the jelly has set completely
- Serve with coconut whipped cream, if desired
- Tastes best when fresh, but keeps covered in the fridge for up to a few days
For the coconut whipped cream (optional):
- You’ll need to keep your tin of coconut milk in the fridge overnight for the rich creamy bit to separate from the watery bit at the bottom. Make sure it is full fat coconut milk, otherwise this separation won’t happen and you won’t be able to make this cream!
- Open the tin upside down – the coconut cream will be at the bottom and you can just pour off the watery liquid (save this for adding to soups or smoothies)
- Place the thick, creamy part into a bowl
- Add the maple syrup and vanilla extract
- Use an electric whisk (or a manual one and a lot of elbow grease) to whip up the coconut cream until light and fluffy
- Carefully pour the coconut whipped cream on top of the strawberry jelly
- Best served after having been kept in the fridge for a few hours
- Tastes best when fresh, but keeps covered in the fridge for up to a few days
Notes
4. No bake Vegan Pumpkin Pie
No-bake Vegan Pumpkin Pie (Gluten-free)
Ingredients
For the crust:
- 65 g (1/2 cup) walnuts (or sub pecan nuts or Brazil nuts)
- 90 g (1/2 cup) pitted dates
- pinch salt
For the filling:
- 150 g (1 cup) cashew nuts soaked overnight in cold water or in boiling water for 10 minutes
- 450 g (15 oz) tin of pumpkin purée
- 5 tbsp maple syrup (or sub any other sweetener)
- 1 tsp vanilla extract
- 20 g (0.7 oz) cacao butter *
For the coconut whipped cream (optional):
- 400 g (14oz tin) of full-fat coconut milk
- 2 tbsp maple syrup (or sub any other sweetener)
- 1/2 tsp vanilla extract
Instructions
For the crust:
- Add all the ingredients for the crust to a food processor and blitz until you get a crust that easily sticks together but that still has some texture.
- Use your fingers to carefully press the mixture across the bottom and up the sides of a pie dish (I used a 22.5 cm/9 inch pie dish) – press down with your fingers, the back of a spoon or the bottom of a small cup or glass to make it as compact as possible.
- Place in the fridge while you make the filling.
For the filling:
- Drain the cashew nuts and place in the same food processor (no need to wash it) along with the pumpkin purée, maple syrup, vanilla and cacao butter.
- Whizz until completely smooth.
- Taste and adjust amount of maple syrup if necessary.
- Place the filling in the crust and place back in fridge for at least a few hours until it sets and firms up before cutting and eating.
- Decorate with coconut whipped cream, if desired.
- Keeps well covered in the fridge for up to a few days.
For the coconut whipped cream:
- You’ll need to keep your tin of coconut milk in the fridge overnight for the rich creamy bit to separate from the watery bit at the bottom. Make sure it is full fat coconut milk, otherwise this separation won’t happen and you won’t be able to make this cream!
- Open the tin upside down – the coconut cream will be at the bottom and you can just pour off the watery liquid (save this for adding to soups or smoothies)
- Place the thick, creamy part into a bowl
- Add the maple syrup and vanilla extract
- Use an electric whisk (or a manual one and a lot of elbow grease) to whip up the coconut cream until light and fluffy
- Take the pie out of the fridge, and ensuring that the custard has completely set, carefully cover it with the coconut whipped cream
- Scatter over the toasted desiccated coconut
- Tastes best when fresh, but keeps covered in the fridge for up to a few days
Notes
5. Vegan Banana Cake (Gluten-free)
Vegan Banana Cake (Gluten-free)
Ingredients
For the cake:
- 3 medium-sized ripe bananas
- 60 g (¼ cup) coconut oil (or sub olive or vegetable oil)
- 4 tbsp maple syrup (or sub any other sweetener)
- 1 tsp apple cider vinegar * (ensure gluten-free if necessary)
- 1 tsp ground cinnamon
- 1 tsp vanilla extract
- 100 g (⅔ cup) raisins **
- 150 g (1 ¼ cup) ground almonds (almond meal) ***
- 150 g (1 ¼ cup) gluten-free flour blend (or sub plain flour if not gluten-free)
- 2 heaped teaspoons baking powder (ensure gluten-free if necessary)
- 1/4 teaspoon bicarbonate of soda (baking soda)
- 120 ml (½ cup) unsweetened almond milk (or any other plant-based milk)
For the frosting:
- 400 g (14 oz) tin of full-fat coconut milk ****
- 2 tbsp lemon juice
- 2 tbsp maple syrup (or sub any other sweetener)
To decorate (optional):
- Banana , sliced
Instructions
For the cake:
- Preheat oven to 180 degrees Celsius (350 degrees Fahrenheit).
- Peel the bananas and place in a wide-bottomed bowl, then use a fork to mash until you get a smooth paste.
- Place the coconut oil in a separate large bowl and melt over a saucepan of boiling water or in the microwave (skip this step if using any other oil).
- Once melted, add the maple syrup to the same bowl along with the vinegar, cinnamon, vanilla, raisins and ground almonds.
- Sift in the flour, baking powder and bicarbonate of soda.
- Add the mashed bananas, and mix well, adding the milk a small amount at a time until you get a loose batter. You may not need to use it all depending on how liquidy your bananas are – you may also need to add a little more milk if your bananas are dry.
- Transfer mixture into a greased baking tin lined with baking paper (I used an 18cm/7inch springform baking tin).
- Bake in oven for around 30 minutes until risen and golden brown and an inserted skewer comes out clean.
- Once out the oven, leave to cool on a wire rack before applying the frosting.
For the frosting:
- You’ll need to keep your tin of coconut milk in the fridge overnight for the rich creamy bit to separate from the watery bit at the bottom. Make sure it is full fat coconut milk, otherwise this separation won’t happen and you won’t be able to make this cream!
- Open the tin upside down – the coconut cream will be at the bottom and you can just pour off the watery liquid (save this for adding to soups or smoothies).
- Place the thick, creamy part into a bowl.
- Add the lemon juice and maple syrup.
- Use an electric whisk (or a manual one and a lot of elbow grease) to whip up the coconut cream until light and fluffy.
To decorate:
- Carefully spread the frosting over the top of the cake.
- Top with the sliced bananas, if desired.
- Best when fresh but keeps covered in the fridge for up to a few days.
Notes
Summary
So, I hope you’ve found some delicious, healthy and easy vegan pie recipes for yourself. Also, some of these recipes don’t require baking. For example, there’s a recipe of no bake vegan pumpkin pie and there’s a recipe of no bake vegan apple pie. Hope you’ll enjoy. Bon appetit!
P.S. If you want to learn more about other vitamins, what are their recommended dosages based on science, get healthy meal plan examples, my top science-based recipes that can be cooked in less than 30 minutes each and find out how science-based nutrition can prevent the most common diseases, improve your overall health and help you live longer then you can click here to learn more.
If you don’t want to miss my other articles then click here to subscribe to my Telegram Channel or use the form below to subscribe to my email newsletter.
You can read some of my other latest articles as well:
- Is having 6 pack abs healthy based on science?
- Does listening to music help with stress based on science?
- Why go vegan and 5 easy steps how to go vegan for beginners
- Is soy healthy based on science or does soy cause cancer?
- 5 healthy vegan salad recipes (oil-free)
- Animal vs plant protein. Which protein is best for health and strength based on science?
- 4 easy vegan pie recipes (+1 bonus recipe)
- Vitamin B12 recommendations based on science
- What is a superset and should you do supersets based on science?
- Top 10 vegan burger recipes
- Can music improve athletic performance based on science?
- How many sets should I do to build muscle based on science?
- Science-based iodine recommendations
- Should you train to failure based on science?
- How much protein can your body absorb in one meal based on science?
- Top 10 motivational quotes
- Omega-3 fatty acids recommendations
- What is the best training frequency for building muscle based on science?
- Best plant-based protein foods
- Happy New Year 2023!
- Does meditation help with stress and aging based on science?
- Is salt healthy based on science?
- Foods to improve performance in sports
- Healthy foods that last for a long time without a fridge
- Science-based macronutrient recommendations for athletes
- Top 7 healthy nuts to eat based on science
- Vitamin D recommendations, dosage, its impact on health
- How to live longer by increasing telomere length
- Healthy beverages based on science
- Recipe: whole wheat no-yeast vegan pizza dough
- What is NEAT? How to lose weight with NEAT?
- Are calcium supplements safe based on science?
- Are nuts good for weight loss and health
- 4 simple steps how I gained 1.5 kg (3+ lbs) per week healthily and how you can too
- Top 5 foods to avoid for weight loss and health
- Is fasting safe for weight loss and health?
- Top 10 healthiest berries
- Does healthy mindset really help improve our results (science-based)?
- Are potatoes healthy for you based on science?
- Is HIIT better than cardio based on science?
- What’s the best free nutrition tracker?
- How to build good habits in 4 simple science-based steps
- What are the scientific benefits of exercise?
- Are eggs actually good for you based on science?
- How to lose weight in 4 easy steps (science-based)
- Is keto diet safe and effective way to lose weight?
- Cardiovascular disease risk factors and treatment
- Is coffee healthy or does it increase the risk of diseases?
- Is laughter the best medicine?
- Can diet prevent and treat diabetes?